
Configuring ACH
Automated Clearing House (ACH) Processing is an add-on module in Mortgage Care. Contact the sales department if you are need it and the option is greyed out.
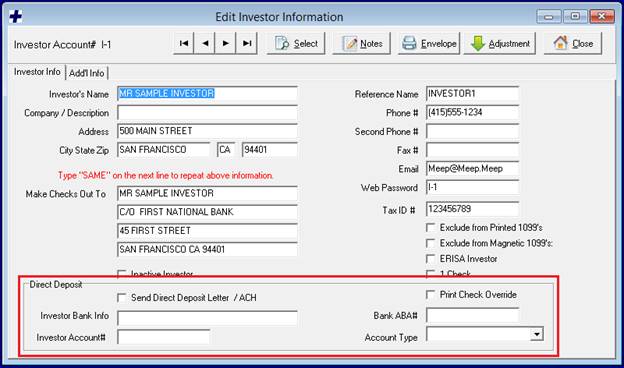
1. Enable Investor ACH. Use the Investors Icon to select the investor you want to enable direct deposit / ACH for. In the Direct Deposit section, check the Send Direct Deposit Letter / ACH checkbox. Fill out the investor’s bank account information.
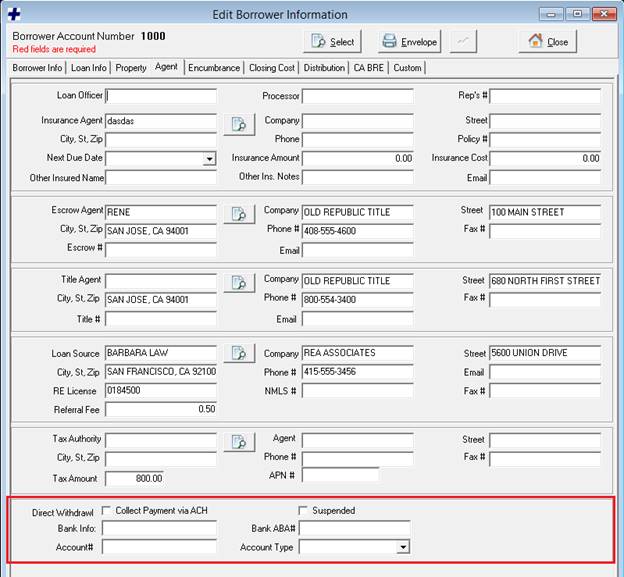
2. Enable Borrower ACH. Use the Borrower Icon to select the borrower you wish to enable Direct Withdrawl / ACH for. On the Agent tab, in the Direct Withdrawl section, check the Collect Payment via ACH checkbox. Fill out the borrower’s bank account information.
Disbursing Funds via ACH
1.
Run Investor ACH Report. Open the ACH window
from the Mortgage+Care Menu: Servicing -> Disbursements -> ACH.
Investor Payments is selected by default.

Set the Check Date range to include any checks with a Hold to Date in the From / To range. Set the Effective Date to the date of the ACH transaction will take place. Click the Report button. The report displays checks that are waiting to be printed for the investors with ACH enabled. You may print or save this report for your records.
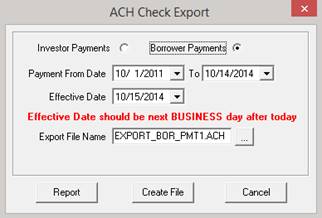
2. Create ACH File. On the ACH Check Export window, set the Export File Name by clicking the … button and selecting a location for the file to be stored. Give the file a unique name. Click the Create File button. The information that appeared on the ACH report will be included in the ACH file. This file is ready to be submitted to NACHA.
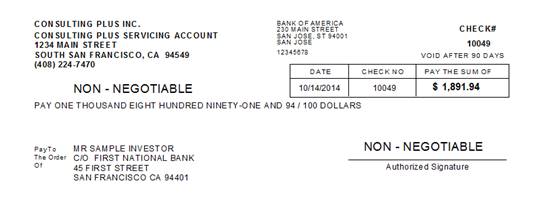
3. Print Checks. Now that the ACH report has been printed and the ACH file submitted, print checks from the Servicing -> Disbursements -> Print Checks menu. Checks that are intended for investors with ACH enabled will print with ‘NON – NEGOTIABLE’ written on them. These checks should be printed and sent to the investors for record keeping.
Collecting Payments via ACH
1. Run Borrower ACH Report. Open the ACH window from Servicing -> Disbursements -> ACH. Select the Borrower Payments option.
Set the Payment Date range to include any borrower payments with a Due Date in the From / To range. Set the Effective Date to the date of the ACH transaction will take place. Click the Report button. The report displays payments that are due for the borrowers with ACH enabled. You may print or save this report for your records.
2. Create ACH File. On the ACH Check Export window, set the Export File Name by clicking the … button and selecting a location for the file to be stored. Give the file a unique name. Click the Create File button. The information that appeared on the ACH report will be included in the ACH file. This file is ready to be submitted to NACHA.
3. Enter Payments. Use the Payments icon to open up the Loan Servicing Payments window. For each account that an ACH transaction was made for, enter the corresponding payment with a Date Received and Deposit Date matching the Effective Date of the ACH transaction.